Understanding dynamic tags
Dynamic tags enable you to personalise the notifications sent out to customers. This allows you to create bulk notifications easily but by addressing each customer by including tags such as their title, first name and last names. Additionally, information regarding their order(s) can be included such as the expected delivery date, the carrier service and their address details.
To do this, you first must have set up a notification, if you haven't done so already, view our article on how to create notifications for more information.
A dynamic tag is a snippet of JSON that signifies the data that should be inserted into a notification. To use a dynamic tag, simply add the relevant field to the text of your notification. For emails, you will need to do so in the relevant template (i.e. via the SendGrid / Postmark UI or the Notification Templates page, as applicable). For SMS notifications, you would insert your tags into the Enter Text for SMS field.
List of dynamic tags
A variety of tags can be used to fully customise the notifications you send. These can range from personal details such as a customer's name, title and contact details, any address details and delivery dates quoted when the order was placed.
Find below the lists of dynamic tags you can use in your notifications both email and SMS:
Consumer tags
The consumer array contains the dynamic tags of the recipient's personal details and contact information.
| Consumer Tags |
|---|
| {{Consumer.Reference}} |
| {{Consumer.Title}} |
| {{Consumer.FirstName}} |
| {{Consumer.MiddleName}} |
| {{Consumer.LastName}} |
| {{Consumer.Phone}} |
| {{Consumer.MobilePhone}} |
| {{Consumer.Email}} |
Address tags
Address tags contain the 'To' or 'From' addresses of the depot and the recipient. If you want to use the recipient's address, use the 'To' address tag.
| Address Tags | |
|---|---|
| From Address | To Address |
| {{Address.From.PropertyName}} | {{Address.To.PropertyName}} |
| {{Address.From.PropertyNumber}} | {{Address.To.PropertyNumber}} |
| {{Address.From.AddressLine1}} | {{Address.To.AddressLine1}} |
| {{Address.From.AddressLine2}} | {{Address.To.AddressLine2}} |
| {{Address.From.AddressLine3}} | {{Address.To.AddressLine3}} |
| {{Address.From.Locality}} | {{Address.To.Locality}} |
| {{Address.From.Region}} | {{Address.To.Region}} |
| {{Address.From.PostalCode}} | {{Address.To.PostalCode}} |
| {{Address.From.CountryIsoCode}} | {{Address.To.CountryIsoCode}} |
Delivery date and time tags
The date and time tags can be used to include any promised or expected delivery dates as well as the delivery slot intervals mentioned in the shipment.
See below for the date tags you can use.
| Delivery Tags |
|---|
| {{ShippedDate.SEE BELOW}} |
| {{OrderDate.SEE BELOW}} |
| {{DeliveredDate.SEE BELOW}} |
| {{PromisedDate.Start.SEE BELOW}} |
| {{PromisedDate.End.SEE BELOW}} |
| {{ExpectedDeliveryDate.Start.SEE BELOW}} |
| {{ExpectedDeliveryDate.End.SEE BELOW}} |
| {{DeliverySlotInterval.Start.SEE BELOW}} |
| {{DeliverySlotInterval.End.SEE BELOW}} |
In the tags above, you must specify the property of the date and/or time you want to include.
For example, if you want to create a notification that includes the date and time of when the delivery was shipped, you can use the {{ShippedDate.GeneralDateShortTime}} tag to display following format DD/MM/YYYY HH:MM.
Please find additional date/time properties available below:
| Date/Time | |
|---|---|
| Properties | Example |
| Second | "40" |
| Minute | "05" |
| Hour | "11" |
| ShortTime | "11:05" |
| Day | "06" |
| Month | "02" |
| Year | "2023" |
| ShortDate | "06/02/2023" |
| GeneralDateShortTime | "06/02/2023 11:05" |
Shipment group tags
If you make use of Shipment Groupings, you can use the {{UntriggeredShipmentsEvents}} and {{TriggeredShipmentsEvents}} arrays to return the values of each individual shipment in that group. For more information, click to view our article on grouping shipments.
View the list below for the tags you can use related to grouped shipments.
| Grouped Shipments Tags | |
|---|---|
| {{TriggeredShipmentsCount}} | |
| {{UnTriggeredShipmentsCount}} | |
| {{TotalGroupShipmentsCount}} | |
| {{TriggeredShipmentEvents.SEE BELOW}} | See example below |
| {{UnTriggeredShipmentEvents.SEE BELOW}} | See example below |
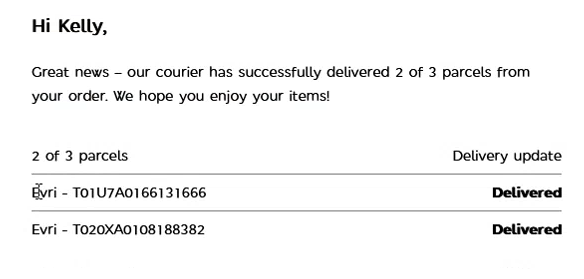
You can use any dynamic tag in the TriggeredShipmentEvents and UnTriggeredShipmentsEvents array to return information on each individual shipment.
For example, the image below shows how a notification would look with the use of the {{TriggeredShipmentsEvents.ShipmentState}} tag to show the status of each shipment in the group.
Additional tags
Additional tags can be used if you want to include the carrier, service and retailer names relating to a customer's order. See below for additional dynamic tags:
| Additional Tags | |
|---|---|
| {{Carrier}} | |
| {{CarrierService}} | |
| {{TrackingReference}} | |
| {{Signee}} | |
| {{RetailerName}} | |
| {{ShipmentState}} | Click to view the list of shipment states |
| {{Metadata Keys}} | Any metadata keys you've created can also be used to display the value as a dynamic tag. See metadata in your notifications for more information. |
How to use dynamic tags in your templates
In reality, you will likely use dynamic tags one field at a time, rather than as a single JSON object. For example, you might enter the following example as notification text:
Hi {{Consumer.FirstName}}! Your package is on its way. To keep an eye on it, go to {{TrackingPageUrl}}.
Metadata in notifications
You can further customise the information in your notifications by adding metadata from your shipments.
For example, supposed that you register a shipment with a Contents metadata property, which you use to supply a description of the shipment contents, as follows:
      "metadata": [
        {
          "key": "Contents",
          "value": "Shoes",
          "type": "String"
        },
      ],
You could then further enhance your notification by adding the dynamic tag to the text. For example:
Hi {{Consumer.FirstName}}! The package with your {{Contents}} in is on its way. To keep an eye on it, go to {{TrackingPageUrl}}.
Tip
Dynamic tags can only display information about a shipment if that shipment has the relevant information registered. In the example above, this would require you to register a customer's first name, and a Contents metadata property.
For more information on registering shipment data, including setting up metadata, see the Registering Shipments page.
Next steps
Read on for more info: